Help Centre
We have trade pricing available on our lens replacement service.
Accounts will need to be verified with the company number and VAT number (if applicable).
Trade pricing is broken down into several tiers:
- Bronze - 5% discount on all lens replacements after your 4th completed order
- Silver - 10% discount on all lens replacements after your 9th completed order
- Gold - 15% discount on all lens replacements after your 14th completed order
Completed orders will consist of either single or a pair of headlights. Pairs of headlights for the same vehicle & service cannot be broken into 2 separate orders for the purpose of inflating order numbers.
Trade discounts are based on the past 12 months (rolling). Orders after 12 months old are automatically rolled of and will not contribute towards your order total.
We aim to reply to WhatsApp messages within 3 business days, however during busy times, this may be up to 5 working days. If it has been over 5 working days, please call or send another message as we may have not received original enquiry.
We aim to reply to emails within 3 business days, however during busy times, this may be up to 10 working days. If it has been over 10 working days, please call or send another email as we may have not received original enquiry.
Unfortunately not - this is due to the soft untreated plastic on the inside of the headlight. Since this has no protection, any attempt at cleaning will cause heavy micro-scratches, regardless of the precautions taken.
As there is no successful way to carry this clearing out, we recommend to change the lenses to new ones if there is water marks, debris, or marking on the inside face of the lens.
Please see refer to this section in addition to the following;
Once the lens replacement has been carried out, there may be slight misting as the ambient air inside the headlight balances out and mixes with the exterior ambient air - this will be at a couple of weeks minimum in ideal conditions or longer in other cases.
If your headlight has had water ingress, there would have been water penetration into all aspects of the headlight - the plastic casing, wiring harnesses etc. Our forced drying as part of the lens replacement/refurbishment & repair service will remove most but not all of the water. The remainder of the water will dry out over a couple of weeks minimum in ideal conditions or longer in other cases and will cause misting.
Removing excess water vapour/humidity from the headlights can be accelerated by cycling silica gel packets.
When your headlight(s) are completed and are ready for collection/postage, you'll be given opportunites to check the headlight over in depth. We strongly recommend that this in done to ensure that you are happy with the headlight, and any concerns we can address there and then to resolve.
For collection, headlights must stay flat during transit to ensure that debris movement is kept to a minimum.
At time of install, if there is any debris within the headlight (for example pieces of old sealant), point the headlight lens towards the sky/ceiling and gently shake the headlight - this will remove all debris from the front of the headlight to the back where it's not visible and behind all surrounds. This is not a defect of the service provided, and is due to the headlight being shaken or handled in a way where the lens is pointing at the floor for a period of time. This can be easily solved within a few minutes.
This is based on our personal experience.
DHL (highly recommended)
Pros:
- Able to schedule collections at short notice
- Insurance covers headlights and has been confirmed to pay out in event of damage in an efficient manner
- Email & SMS notifications
- Minimal delivery issues
- Global shipping with varying levels of delivery windows
- Able to speak to someone at the contact centre fairly easily
- Able to drop off and collect at local depot
Cons:
- Cost of transit and insurance is relatively high compared to other couriers
- Contact call centre charges are above average
- Delivery/collection not available on weekends
DPD
Pros:
- Cheaper than DHL
- Established company
- Live tracking with an estimated time of arrival
Cons:
- Insurance process not confirmed
- Tendancy to be rougher with packages leading to headlight damage
- Several occasions where the drivers have been running late and falsified no delivery reasons, contact centre unable to reschedule and they will deliver within a couple of days from initial delivery date
- Not able to drop off or collect from local depot
Royal Mail/Parcel Force (not recommended)
Pros:
- Very cheap
- Established company
- Plentiful collection and drop off locations
- Online tracking
Cons:
- Parcel Force have exclusions for headlights under their shipping insurance
- If missed delivery, unable to reschedule delivery for up to a couple of working days
- Signed for service is unable to be left with neighbours
- Limited hours to collect from delivery office
- Check the functionality of tail lights before installation into the vehicle
- Peel off the protector wrapper from the edges of the tail lights before installation. This will make sure that it doesn't get trapped in between the tail light and the chassis/boot lid
- Remove all spacers or stand-offs on the old tail lights/vehicle chassis. If you leave these on and install the tail lights into the rear quarter panel, the fitment won't be flush with the chassis
- On the inner tail lights, peel off the protective cover on the foam gasket, and adhere to the tail light. This creates a waterproof seal between the inside of the boot and the exterior of the car. Without applying this gasket, you'll risk water ingress and premature failure of the inner boot lights - this isn't covered under warranty!
Look at the back of the tail light and you'll see 2 red wires with a male & female connector - disconnect/reconnect to switch between solid & sequential modes

Within our angel eye conversions, we use two brands;
- KYCS (our in house brand) - get the styling you want at a cost-effective price
- BavGruppe Design - high-end products for high-end vehicles, with a higher price point
The BavGruppe Design products are the highest quality products you can get for custom headlights. They're super bright and have a totally seamless light output due to CAD designed injection moulded covers twinned with gel coated SMD boards which give an unparalleled seamless light output which outshines both OEM and other aftermarket solutions for angel eyes. You can see more of their work on Instagram or website.
Our in house range is sourced from the far East, and we've been using the same manufacturer for over 7 years now. These are the best quality angel eyes available within the location/sector and are extremely cost-effective. They are lower brightness and less seamless light output than the BavGruppe Design products.
KYCS Angel Eyes Colour Upgrades
By default, the angel eyes will have one colour (white) only.
Switchback
This is when the angel eyes are white during normal operation, and then switch to orange/amber when indicating (in time with the indicators). When the indicators are cancelled, after a brief pause the angel eyes will turn back to white.
Colour Changing
All angel eyes will change to a single colour that you can select from the smartphone app, along with colour changing patterns that are available (for example cycle through 7 colours)
Advanced Colour Changing
Any part of any angel eye can be changed to any colour independently from the smartphone app, and comes with preset patterns that you can cycle through. Also known as flowing, or colour chasing angel eyes.
For additional configuration, you can upgrade from the default advanced colour changing modules to the Ghozt module, which allows you to set certain sections of the angel eyes to functions such as indicators and have custom defined show modes for colours, patterns, and lock/unlock.
BavGruppe Design Angel Eyes Colour Upgrades
Switchback
This is when the angel eyes are white during normal operation, and then switch to orange/amber when indicating (in time with the indicators). When the indicators are cancelled, after a brief pause the angel eyes will turn back to white.
Dual Colour (White & Amber/Red/Blue/CSL Yellow)
Angel eyes will come on white as default, and can be changed to the secondary colour via physical remote fob.
Colour Changing
All angel eyes will change to a single colour that you can select from the smartphone app, along with colour changing patterns that are available (for example cycle through 7 colours)
Advanced Colour Changing
Any part of any angel eye can be changed to any colour independently from the smartphone app, and comes with preset patterns that you can cycle through. Also known as flowing, or colour chasing angel eyes.
For additional configuration, you can upgrade from the default advanced colour changing modules to the Ghozt module, which allows you to set certain sections of the angel eyes to functions such as indicators and have custom defined show modes for colours, patterns, and lock/unlock.
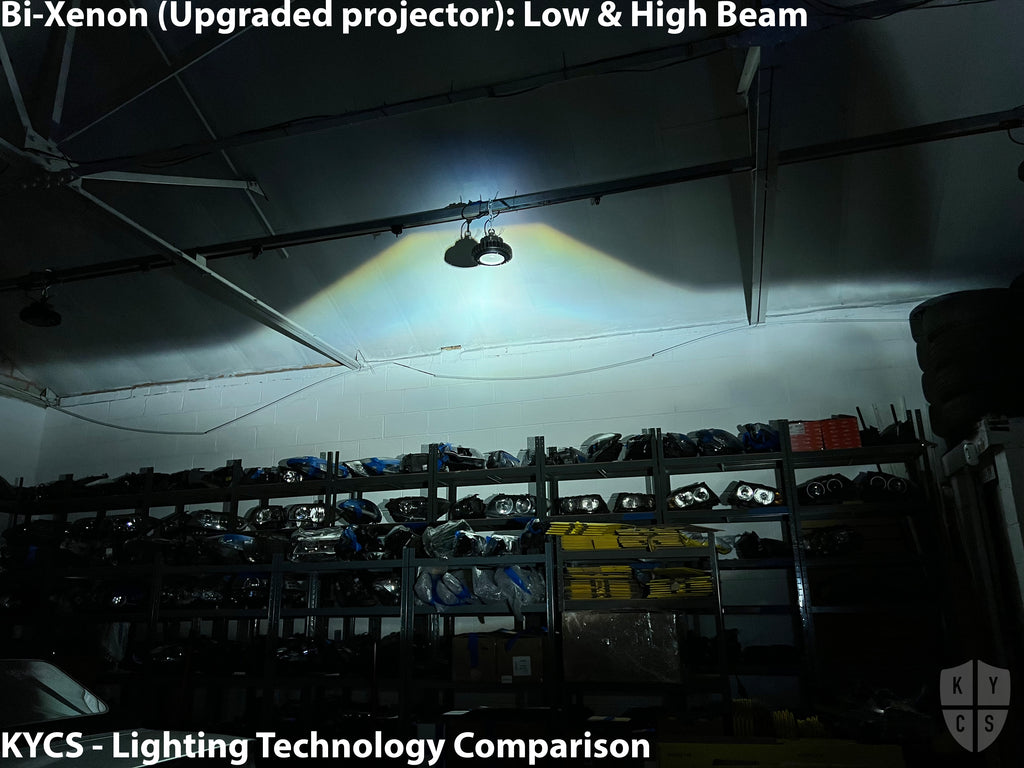
If you’ve ever wanted to see a direct comparison between all the lighting technologies and how they perform against each other, we’ve just done that!
Headlights & Components Used
Halogen: E90 pre LCI halogen with the front plastic lens removed
Bi-xenon: E92 pre LCI bi-xenon standalone projector
Bi-xenon (upgraded projector lens): E92 pre LCI bi-xenon standalone projector with ZKW-R lens upgrade
Bi-xenon (upgraded projector): G5-BRT bi-xenon projector
Bi-LED: KYCS Bi-LED projector with LED bulb (low beam), high beam LED array twinned with low beam projector shutter
OEM Bi-LED: F22 LCI LED bi-LED projector
Upgraded bi-LED: KYCS integrated Bi-LED
All bi-xenon projectors used the same second hand bulb - expect much more light output when using a new set of quality bulbs like Osram Laser Nightbreaker!
Lux Comparison
Please note that we don't have state of the art measuring equipment (yet) - take all figures as approximations, and they've been rounded to the nearest ten. Lux is a measure of brightness (Lumen per square meter).
Measurements are taken from the centre "hotspot", but this isn't the entire picture - beam pattern size (width and depth) also play a major factor in how much usable light you have. For example, our Bi-LED setup has a much larger width and depth (beam pattern) but a lower brightness than a comparable xenon setup which is a smaller beam pattern but a higher brightness.
Need a hand deciding what you'd like in your custom headlights? Get in touch with us via the contact form and we'll be happy to help!
| Headlight | Low Beam (Lux) | Low & High Beam (Lux) |
| Halogen | 200 | 420 |
| Bi-xenon | 1500 | 3300 |
| Bi-xenon (upgraded projector lens) | 2020 | 3900 |
| Bi-xenon (upgraded projector) | 4210 | 8320 |
| Bi-LED | 860 | 6280 |
| OEM bi-LED | 1580 | 5160 |
| Upgraded bi-LED | 4660 | 5940 |
Photos
Photos were taken on an iPhone with locked exposure and focus - unfortunately the white balance isn't consistent between photos, but the brightness is accurate!


High Beam LED Array
Our KYCS high beam LED array is a pencil beam, which provides superb range over beam width. When twinned with a bi-LED or bi-xenon, light output is unrivalled.

Misting is expected as the headlights are open units, and will be affected by ambient weather conditions & humidity levels.
A quick overview of why misting occurs;
- When the car and/or headlights are running, the internal temperature of the headlights increases much higher than the outside ambient (colder) air
- As there is a heat source inside the light, the air is circulated within the headlight
- The headlight/car turns off, or certain functions turn off - the heat source is no longer present, and this stops the air inside of the headlight from circulating
- The hot air inside of the headlight is unable to rapidly cool down or escape the headlight leaving a large temperature difference between the inside and outside of the headlight with no circulation. This leads to the stale non-moving air by the front of the lens to be cooled by the cold lens which leads to misting on the inside of the lens
- The misting will evaporate back into the headlight by itself
This is similar to breathing on a cold window.
The amount of misting depends on a number of factors, but will usually be higher in certain conditions like after a car wash, while raining, or in cold conditions are the ambient humidity is linked to the temperature. It has been noticed that on vehicles that produce more heat (V8, V10, tuned engines), this is also a contributing factor. Misting will always be more common & prevalent in winter. Upgrading components from low power/low heat to comparative high power/high heat will also have an impact on misting - for example changing from a 501/T10 sidelight bulb to BavGruppe Design angel eyes will have a large impact on the amount of heat emitted on the sidelights.
Misting will occur in factory OEM headlights that have not been modified, and are referenced in the BMW handbook & supporting technical documents available to main dealer. Misting may look more excessive with our custom lights as the previous chrome areas have been painted black, and misting that would have blended in on a chrome background stand out more on a black background.
We reference and use the supporting technical documents available to main dealer as guidelines for our custom headlights. More information about what is and isn't classed as excessive is found on the product page for your custom headlights under 'Guarantee/Warranty'.
As a rule of thumb, misting is fine and condensation is not. Condensation is classed as when water droplets form on the inside of the lens and roll down the front of the lens.
If you want to confirm if your custom headlights have misting or condensation, please contact us using the contact form with the following information:
- Your order number
- Your vehicle make
- Your vehicle model & engine size
- Pictures of the headlights at their worst, and in what the ambient weather conditions were - we need pictures of the headlights in a continuous/running 5-day window
- How often this happens, and under what circumstances
Once we have all of the information above, we'll confirm what actions needed to be taken (if any).
If you'd like to generally reduce misting, you can either use silica gel packets (recommended 10G in the summer and 20G in the winter), or install additional breathers to allow the headlight to cool down quicker before misting on the inside of the lens.
- Locate the driver within the headlight using the pictures below and confirm that there is one single yellow input wire coming from the headlight, one braided input loom coming from the headlight (both will come out of the same side of the driver) and one braided output loom going to the LED eyebrow strip (on the opposite side of the input wires)
- Ensure that the car and all vehicle lighting is switched off and the angel eyes/eyebrows are not lit up
- Confirm that you have the correct replacement driver (2 or 3 pins)
- Disconnect the braided output loom (either 2 or 3 pins), and connect the braided output loom from the replacement new driver
- Disconnect the single yellow input wire (1 pin), and connect the single yellow input wire from the replacement new driver
- Disconnect the braided output loom (2 pins), and connect the braided output loom from the replacement new driver
- Check that everything works as expected before reassembling or replacing caps
- Arrange and zip tie any excess wire to ensure that it won't get snagged or caught within the headlight
This guide is only applicable for situations where your driver has been identified as being faulty and requires replacement. The eyebrow drivers are specifically matched and designed for each eyebrow LED strip - they are not cross-compatible with all LED strips! We will send out the correct driver for your LED strip.


If your new custom headlights are flickering when you start the car, and at random intervals when the car is on, you need to code your car to change its output from halogen to LED.
This will either be your FRM, LM, or FEM depending on your vehicle. Most BMWs from 1999 will be able to be coded.
You can code your module with any of the following applications;
- ProTool (mobile app, Android only)
- BimmerCode (mobile app)
- Carly (mobile app)
- BMW Standard Tools (Windows application)
You will need appropriate hardware to link to your vehicle, which is app dependent.
If you're not comfortable coding your vehicle, we can do it for you either in person or remotely.
Prior to installing custom headlights supplied by us (covering both our in-house hardware, and BavGruppe Design hardware) you'll need to code the following items on your vehicle before installing headlights onto your vehicle:
4 Series, M3, M4 (F3x, F8x) - Pre LCI Xenon/Adaptive Xenon Headlights
BimmerCode
- US sidemarkers = Off
- LED conversion front turn signal = Active
eSys
FEM > 3061 > FRA_V_R_KALTUEBERWACHUNG = nicht_activ
FEM > 3061 > FRA_V_R_WARMUEBERWACHUNG = nicht_activ
FEM > 3061 > FRA_V_R_IS_LED = active
FEM > 3061 > FRA_V_L_KALTUEBERWACHUNG = nicht_activ
FEM > 3061 > FRA_V_L_WARMUEBERWACHUNG = nicht_activ
FEM > 3061 > FRA_V_L_IS_LED = activ